
Le but de ce projet est de créer un module sur une machine à coudre afin de la transformer en brodeuse numérique. Ce module peut s’ajouter et s’enlever de la machine afin qu’elle puisse garder sa fonction première. Notre travail a donc premièrement été de construire la partie physique du module.
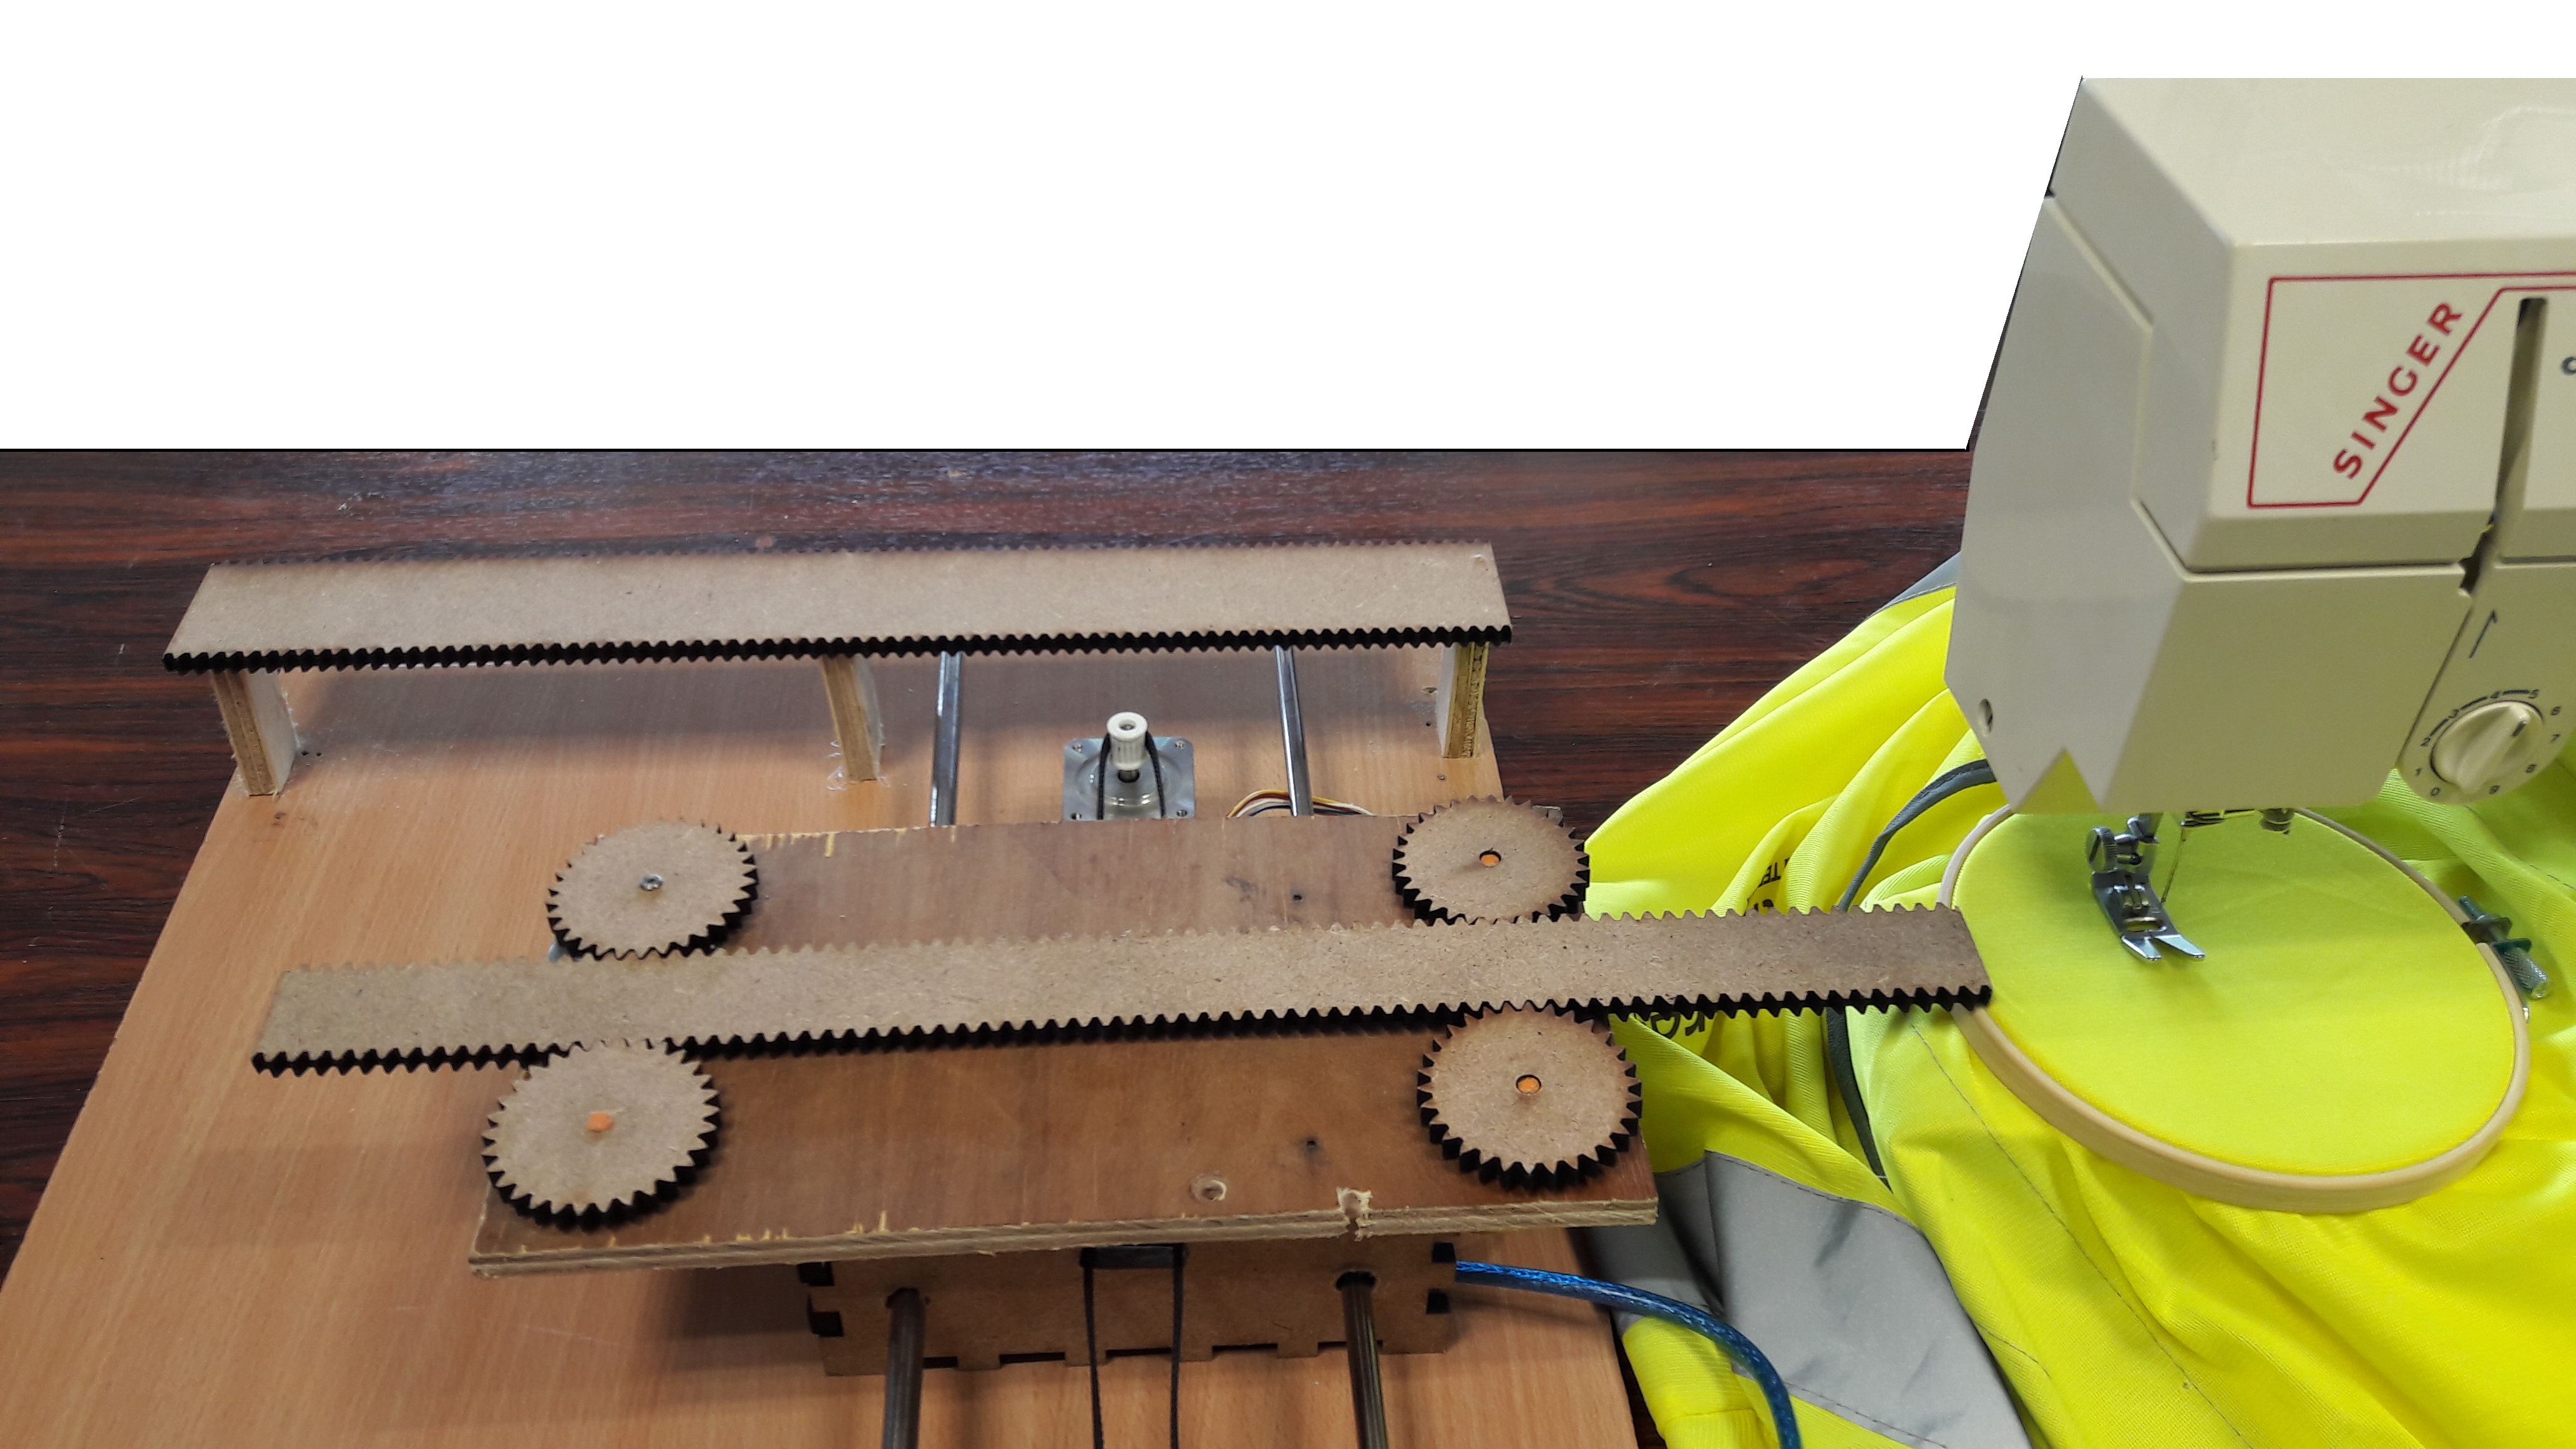
figure 1 : module final
Le tambour, qui permet de tendre le tissu à broder, est relié à un rail denté. Celui-ci est entraîné en translation par un moteur relié à un pignon. Les trois autres pignons permettent au rail de tenir sa trajectoire. Les pignons et le rail reposent sur une plateforme en bois qui est la partie supérieure d’un boîtier.
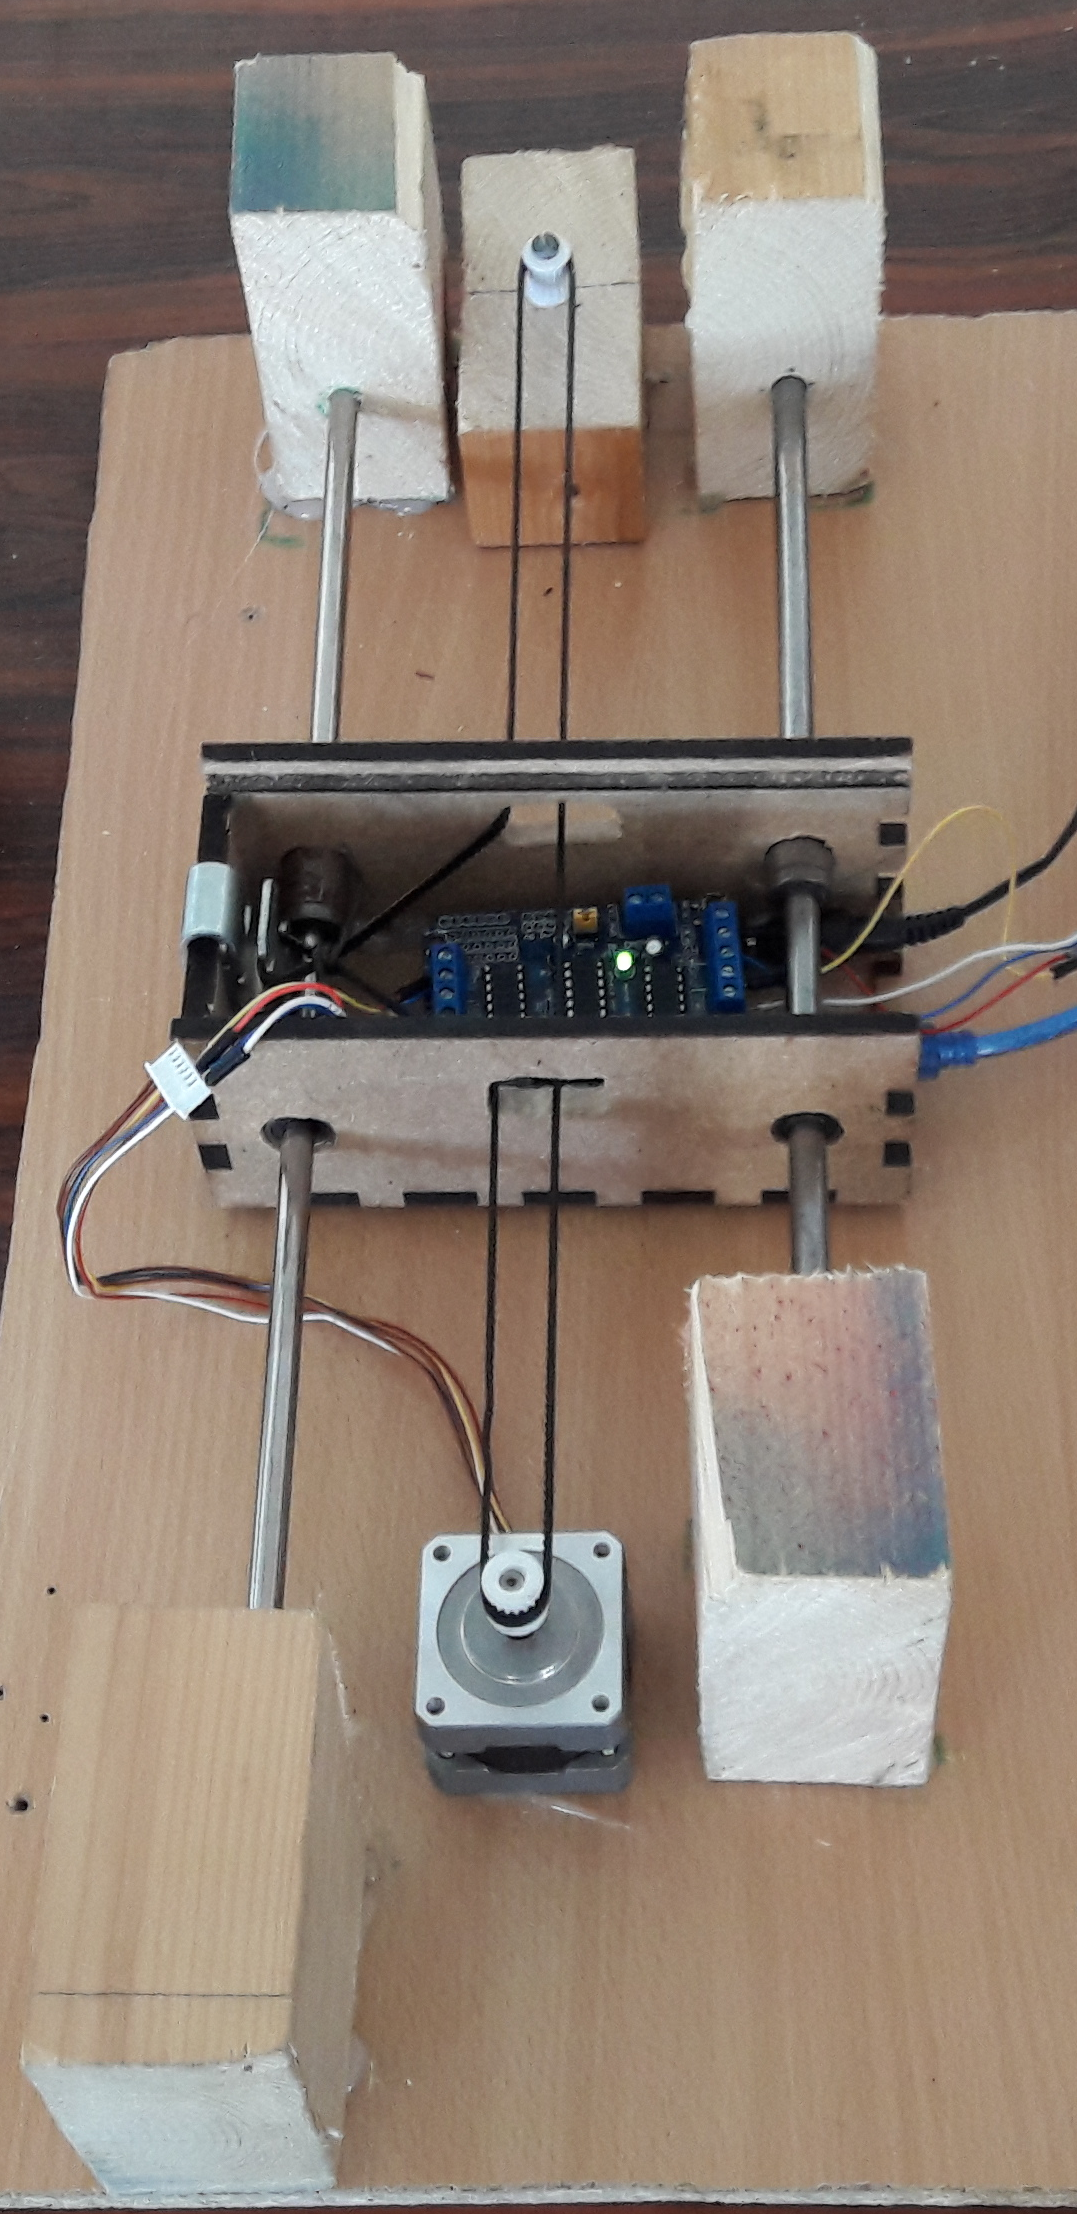
figure 2 : boîtier et tiges métalliques
Deux tiges métalliques passant dans des roulements à billes traversent ce boîtier. Une courroie est reliée au moteur et permet le déplacement selon la direction perpendiculaire à celle du rail denté. Ce système est contraint à beaucoup moins de frottement que celui à base de rouages et d’une crémaillère en bois, il est donc plus facile pour le moteur d’entraîner le boîtier. Le boîtier abrite la carte Arduino qui est reliée aux moteurs.
La seconde partie du projet a été de convertir une image numérique en commandes pour les moteurs. Nous avons tout d’abord téléversé sur la carte Arduino un code qui permet d’interpréter un G-code, et donc de transformer ce Gcode en commande de rotation des moteurs. Ce code est commun à n’importe quel motif à broder. Il nous a alors fallu convertir le motif à broder en G-code et envoyer ce code à la carte Arduino. Nous pouvons faire cette conversion à l’aide du logiciel Inkscape. Pour ce faire, un certain nombre d’étapes sont à suivre :
- Il faut effectuer une symétrie centrale sur l’image du motif à broder, car le G-code obtenu est celui dans le cas où l’aiguille de la machine à coudre se déplace, or dans notre cas c’est le module qui se déplace tandis que l’aiguille garde une position fixe.
- Il faut choisir des « Points d’orientation », c’est-à-dire fixer un repère sur l’image afin de s’assurer que les déplacements vont s’effectuer dans le sens voulu et à partir du point de départ voulu. Ils servent aussi à gérer les différentes transformations de l’image (symétrie, translations, etc…).
- Une fois cette étape réalisée, Inkscape possède l’outil « Objet en chemin » qui permet de préparer l’utilisation de Gcodetools en posant le chemin à suivre.
- Enfin il faut utiliser « Chemins vers G-code » qui convertit effectivement le chemin calculé en la suite de commandes voulues. Des flèches indiquent le chemin tracé.
Un logiciel permet ensuite d’envoyer le fichier vers la carte Arduino, et les moteurs réagissent instantanément aux commandes reçues.
Elodie Derringer, Charles Rivière et Alexandre Ly
Code téléversé sur la carte Arduino
#code pour une découpeuse laser, l'axe z ne sert à rien.

#include <Servo.h>
#include <AFMotor.h>

#define LINE_BUFFER_LENGTH 512

char STEP = MICROSTEP ;

// Servo position for Up and Down
const int penZUp = 115;
const int penZDown = 83;

// Servo on PWM pin 10
const int penServoPin =10 ;

// Should be right for DVD steppers, but is not too important here
const int stepsPerRevolution = 200;

// create servo object to control a servo
Servo penServo;

// Initialize steppers for X- and Y-axis using this Arduino pins for the L293D H-bridge
AF_Stepper myStepperY(stepsPerRevolution,2);
AF_Stepper myStepperX(stepsPerRevolution,1);

/* Structures, global variables */
struct point {
float x;
float y;
float z;
};

// Current position of plothead
struct point actuatorPos;

// Drawing settings, should be OK
float StepInc = 1;
int StepDelay = 0;
int LineDelay =0;
int penDelay = 50;

// Motor steps to go 1 millimeter.
// Use test sketch to go 100 steps. Measure the length of line.
// Calculate steps per mm. Enter here.
float StepsPerMillimeterX = 100.0;
float StepsPerMillimeterY = 100.0;

// Drawing robot limits, in mm
// OK to start with. Could go up to 50 mm if calibrated well.
float Xmin = 0;
float Xmax = 40;
float Ymin = 0;
float Ymax = 40;
float Zmin = 0;
float Zmax = 1;

float Xpos = Xmin;
float Ypos = Ymin;
float Zpos = Zmax;

// Set to true to get debug output.
boolean verbose = false;

// Needs to interpret
// G1 for moving
// G4 P300 (wait 150ms)
// M300 S30 (pen down)
// M300 S50 (pen up)
// Discard anything with a (
// Discard any other command!

/**********************
* void setup() - Initialisations
***********************/
void setup() {
// Setup

Serial.begin( 9600 );

penServo.attach(penServoPin);
penServo.write(penZUp);
delay(100);

// Decrease if necessary
myStepperX.setSpeed(1000);

myStepperY.setSpeed(1000);

// Set & move to initial default position
// TBD

// Notifications!!!
Serial.println("Mini CNC Plotter alive and kicking!");
Serial.print("X range is from ");
Serial.print(Xmin);
Serial.print(" to ");
Serial.print(Xmax);
Serial.println(" mm.");
Serial.print("Y range is from ");
Serial.print(Ymin);
Serial.print(" to ");
Serial.print(Ymax);
Serial.println(" mm.");
}

/**********************
* void loop() - Main loop
***********************/
void loop()
{

delay(100);
char line[ LINE_BUFFER_LENGTH ];
char c;
int lineIndex;
bool lineIsComment, lineSemiColon;

lineIndex = 0;
lineSemiColon = false;
lineIsComment = false;

while (1) {

// Serial reception - Mostly from Grbl, added semicolon support
while ( Serial.available()>0 ) {
c = Serial.read();
if (( c == '\n') || (c == '\r') ) { // End of line reached
if ( lineIndex > 0 ) { // Line is complete. Then execute!
line[ lineIndex ] = '\0'; // Terminate string
if (verbose) {
Serial.print( "Received : ");
Serial.println( line );
}
processIncomingLine( line, lineIndex );
lineIndex = 0;
}
else {
// Empty or comment line. Skip block.
}
lineIsComment = false;
lineSemiColon = false;
Serial.println("ok");
}
else {
if ( (lineIsComment) || (lineSemiColon) ) { // Throw away all comment characters
if ( c == ')' ) lineIsComment = false; // End of comment. Resume line.
}
else {
if ( c <= ' ' ) { // Throw away whitepace and control characters
}
else if ( c == '/' ) { // Block delete not supported. Ignore character.
}
else if ( c == '(' ) { // Enable comments flag and ignore all characters until ')' or EOL.
lineIsComment = true;
}
else if ( c == ';' ) {
lineSemiColon = true;
}
else if ( lineIndex >= LINE_BUFFER_LENGTH-1 ) {
Serial.println( "ERROR - lineBuffer overflow" );
lineIsComment = false;
lineSemiColon = false;
}
else if ( c >= 'a' && c <= 'z' ) { // Upcase lowercase
line[ lineIndex++ ] = c-'a'+'A';
}
else {
line[ lineIndex++ ] = c;
}
}
}
}
}
}

void processIncomingLine( char* line, int charNB ) {
int currentIndex = 0;
char buffer[ 64 ]; // Hope that 64 is enough for 1 parameter
struct point newPos;

newPos.x = 0.0;
newPos.y = 0.0;

// Needs to interpret
// G1 for moving
// G4 P300 (wait 150ms)
// G1 X60 Y30
// G1 X30 Y50
// M300 S30 (pen down)
// M300 S50 (pen up)
// Discard anything with a (
// Discard any other command!

while( currentIndex < charNB ) {
switch ( line[ currentIndex++ ] ) { // Select command, if any
case 'U':
penUp();
break;
case 'D':
penDown();
break;
case 'G':
buffer[0] = line[ currentIndex++ ]; // /!\ Dirty - Only works with 2 digit commands
// buffer[1] = line[ currentIndex++ ];
// buffer[2] = '\0';
buffer[1] = '\0';

switch ( atoi( buffer ) ){ // Select G command
case 0: // G00 & G01 - Movement or fast movement. Same here
case 1:
// /!\ Dirty - Suppose that X is before Y
char* indexX = strchr( line+currentIndex, 'X' ); // Get X/Y position in the string (if any)
char* indexY = strchr( line+currentIndex, 'Y' );
if ( indexY <= 0 ) {
newPos.x = atof( indexX + 1);
newPos.y = actuatorPos.y;
}
else if ( indexX <= 0 ) {
newPos.y = atof( indexY + 1);
newPos.x = actuatorPos.x;
}
else {
newPos.y = atof( indexY + 1);
indexY = '\0';
newPos.x = atof( indexX + 1);
}
drawLine(newPos.x, newPos.y );
// Serial.println("ok");
actuatorPos.x = newPos.x;
actuatorPos.y = newPos.y;
break;
}
break;
case 'M':
buffer[0] = line[ currentIndex++ ]; // /!\ Dirty - Only works with 3 digit commands
buffer[1] = line[ currentIndex++ ];
buffer[2] = line[ currentIndex++ ];
buffer[3] = '\0';
switch ( atoi( buffer ) ){
case 300:
{
char* indexS = strchr( line+currentIndex, 'S' );
float Spos = atof( indexS + 1);
// Serial.println("ok");
if (Spos == 30) {
penDown();
}
if (Spos == 50) {
penUp();
}
break;
}
case 114: // M114 - Repport position
Serial.print( "Absolute position : X = " );
Serial.print( actuatorPos.x );
Serial.print( " - Y = " );
Serial.println( actuatorPos.y );
break;
default:
Serial.print( "Command not recognized : M");
Serial.println( buffer );
}
}
}

}

/*********************************
* Draw a line from (x0;y0) to (x1;y1).
* int (x1;y1) : Starting coordinates
* int (x2;y2) : Ending coordinates
**********************************/
void drawLine(float x1, float y1) {

if (verbose)
{
Serial.print("fx1, fy1: ");
Serial.print(x1);
Serial.print(",");
Serial.print(y1);
Serial.println("");
}

// Bring instructions within limits
if (x1 >= Xmax) {
x1 = Xmax;
}
if (x1 <= Xmin) {
x1 = Xmin;
}
if (y1 >= Ymax) {
y1 = Ymax;
}
if (y1 <= Ymin) {
y1 = Ymin;
}

if (verbose)
{
Serial.print("Xpos, Ypos: ");
Serial.print(Xpos);
Serial.print(",");
Serial.print(Ypos);
Serial.println("");
}

if (verbose)
{
Serial.print("x1, y1: ");
Serial.print(x1);
Serial.print(",");
Serial.print(y1);
Serial.println("");
}

// Convert coordinates to steps
x1 = (int)(x1*StepsPerMillimeterX);
y1 = (int)(y1*StepsPerMillimeterY);
float x0 = Xpos;
float y0 = Ypos;

// Let's find out the change for the coordinates
long dx = abs(x1-x0);
long dy = abs(y1-y0);
int sx = x0<x1 ? StepInc : -StepInc;
int sy = y0<y1 ? StepInc : -StepInc;

long i;
long over = 0;

if (dx > dy) {
for (i=0; i<dx; ++i) {
myStepperX.onestep(sx,STEP);
over+=dy;
if (over>=dx) {
over-=dx;
myStepperY.onestep(sy,STEP);
}
delay(StepDelay);
}
}
else {
for (i=0; i<dy; ++i) {
myStepperY.onestep(sy,STEP);
over+=dx;
if (over>=dy) {
over-=dy;
myStepperX.onestep(sx,STEP);
}
delay(StepDelay);
}
}

if (verbose)
{
Serial.print("dx, dy:");
Serial.print(dx);
Serial.print(",");
Serial.print(dy);
Serial.println("");
}

if (verbose)
{
Serial.print("Going to (");
Serial.print(x0);
Serial.print(",");
Serial.print(y0);
Serial.println(")");
}

// Delay before any next lines are submitted
delay(LineDelay);
// Update the positions
Xpos = x1;
Ypos = y1;
}

// Raises pen
void penUp() {
penServo.write(penZUp);
delay(penDelay);
Zpos=Zmax;
digitalWrite(15, LOW);
digitalWrite(16, HIGH);
if (verbose) {
Serial.println("Pen up!");

}
}
// Lowers pen
void penDown() {
penServo.write(penZDown);
delay(penDelay);
Zpos=Zmin;
digitalWrite(15, HIGH);
digitalWrite(16, LOW);
if (verbose) {
Serial.println("Pen down.");

}
}

Bonjour
Ires intéressant
je suis bonnetier (je programme les tricots sur machine), connais bien les machines a coudre
et en plus nouvelle découverte d Arduino
je me pose la question suivante
est il possible de synchroniser les déplacements du cadre quand l aiguille de la machine est relevée?
Merci
Salutations
A Toffolo
Commentaire comment faire pour revenir à la ligne lorsque le fil de coupe merci